Hivernacle d’hivern de bricolatge
Contingut:
Tot jardiner somia amb instal·lar un hivernacle d’hivern al seu jardí. Al cap i a la fi, el cultiu de verdures, fruites i baies es fa possible durant els dotze mesos. És molt car construir un hivernacle d’hivern, ja que és necessari proporcionar el microclima necessari, que requerirà no només la construcció de l’edifici en si, sinó que també caldrà instal·lar un aïllament tèrmic. Cal instal·lar sistemes que mantinguin el microclima desitjat, proporcionin electricitat i aigua. A continuació, compartirem informació per ajudar-vos a establir un hivernacle hivernal robust que farà la seva feina fins i tot a les zones amb hiverns més durs. Llavors, què és un hivernacle d’hivern i com construir-lo vosaltres mateixos.
Quines diferències hi ha entre els hivernacles d’hivern i d’estiu? Quina és la raó del seu cost tan elevat? La resposta a això només es pot considerar tenint en compte tots els processos que es produeixen a l’hivernacle durant l’estació freda.
Hivernacle d’hivern amb calefacció: per què cal i quins mètodes d’escalfament existeixen?
A l’estiu, l’hivernacle s’escalfa pels raigs del sol. Durant el dia, la terra i l’estructura en si són escalfades pel sol, mentre que a la nit desprèn la calor acumulada. Això ajuda a estabilitzar la temperatura, cosa que crea un ambient confortable per als cultius hortícoles. El temps ennuvolat tampoc afectarà negativament els cultius, perquè a l’estiu les hores de llum són llargues, cosa que permet que l’hivernacle s’escalfi prou bé.
A l’hivern, sobretot si es tracta de latituds del nord, les hores de llum del dia són molt curtes i el sol només surt alt durant poc temps. Els raigs solars només tenen temps per tocar lleugerament el sòl i no l’escalfen. A la nit, el terra es refreda i es congela quan comencen les gelades. Això està relacionat amb els motius de la necessitat d’escalfar edificis d’hivern mitjançant sistemes de calefacció.
L’hivernacle hivernal es pot escalfar de diverses maneres. Estufes, escalfadors d’aigua, escalfadors de gas o electricitat són adequats. Tot prové de desitjos, capacitats financeres i la mida de l’edifici. A l’hora d’escollir, el més important és parar atenció a la potència del dispositiu, és important que sigui suficient per escalfar l’hivernacle durant els mesos freds.
Hivernacle hivernal: aïllant
És important triar el dispositiu de calefacció adequat, però no serà eficaç si l’aïllament és deficient. Per reduir la pèrdua de calor, cal enterrar l’hivernacle al terra, erigir parets aïllades en blanc, fer servir doble vidre o policarbonat de 10 mm o més de gruix.
També és molt important segellar adequadament les juntes i les esquerdes. Els hivernacles encastats tenen excel·lents característiques d’aïllament tèrmic, però presenten alguns dels desavantatges que s’enumeren a continuació.
Hivernacle encastat d’hivern: com fer un marc
Per tal de crear un bon aïllament tèrmic, cal aprofundir l’hivernacle al terra de manera que quedi per sota del nivell de congelació del terreny. En latituds temperades, l’hivernacle s’hauria de baixar a una profunditat d’un metre i mig. A latituds més septentrionals, dos metres.Per preparar aquest pou, caldran més inversions financeres.
Per a aquest tipus d’hivernacles, els llocs on es trobin aigües subterrànies a prop de la superfície del sòl no seran adequats. Si no hi ha cap altre lloc, haureu d’instal·lar un sistema especial que recollirà i eliminarà les aigües subterrànies.
Les parets d’aquesta estructura haurien de ser de formigó d’alta qualitat que no permeti el pas de l’aigua. Per tant, tota la feina no només és prou costosa, sinó que també resulta difícil per dur-la a terme tot sol.
Hivernacle d’hivern: instal·lació de bricolatge
Es poden utilitzar materials com formigó espumós, blocs de calor i fusta per construir parets aïllades en blanc.
Polyfoam servirà com a excel·lent aïllament aquí. Aquest material és fàcil d’instal·lar, resistent a la humitat i no es podreix.
Per aïllar l’aire fred del terra, és adequada una zona cega aïllada, l’amplada de la qual no ha de ser inferior a 50 centímetres.
És important saber que les parets de l’hivernacle només s’aïllen de l’exterior.
Com aïllar un soterrani d’hivernacle

El que està cobert l’hivernacle també és molt significatiu. El recobriment no ha d’interferir amb una bona transmissió de la llum i un bon aïllament tèrmic. Si s’utilitza vidre per a l’estructura, hauria de ser doble o triple i els espais entre ells seran d’1 a 3 centímetres.
Si s’utilitza policarbonat, caldrà un perfil especial. Això crearà aïllament per a la bresca interior. També ajudarà a crear un buit d’aire segellat amb excel·lents qualitats d’aïllament tèrmic.
Una capa es posa amb policarbonat, el gruix del qual és de 1-2,5 centímetres. Si el gruix no supera els 0,6 centímetres, es col·loca en dues capes.
És important saber que la pel·lícula només s’utilitza per als hivernacles d’hivern a les zones on les nevades són molt rares. Si hi ha molta neu, la pel·lícula s’estirarà i es trencarà.
Com regar les plantes i què instal·lar per a això

Perquè les plantes creixin bé, es desenvolupin i fructifiquin, necessiten una quantitat suficient d’aigua. Si l’hivernacle té una àmplia superfície, haureu d’utilitzar molta aigua. Per tant, a l’hora d’establir les bases, cal pensar en una font que subministri líquid a les plantes.
Si teniu previst connectar les canonades a un sistema de subministrament d’aigua o a un pou, haurien d’arribar prou a la terra sota terra. Si la col·locació té lloc al sud del país, haurien d’anar a la terra fins a una profunditat de 100 centímetres, si es troba al nord, almenys 1,8 metres. Si l’hivernacle ocupa una àmplia superfície i serveix per a la producció de cultius a escala industrial, seria molt més convenient tallar un pou a prop de l’hivernacle.
Per tal que l’aigua es pugui escalfar, són adequats els dipòsits, el volum dels quals és de 0,2 a 1 metre cúbic. S’han d’instal·lar en un petit turó per tal de crear la pressió necessària per als sistemes de reg. Per no crear una ombra per a les cultures, cal situar-les al costat nord. L’aigua s’escalfa amb el sol. També podeu fer calefacció artificial mitjançant elements calefactors.
És important saber que el recipient on es troba l’aigua serveix de bon acumulador de calor. Escalfat durant el dia, comparteix la seva calor i es refreda gradualment a la nit. I això redueix els salts de temperatura.
Hivernacle i ventilació hivernals
Perquè les plantes creixin amb èxit, necessiten ventilació. Gràcies a ell, les plantes poden rebre la quantitat necessària d’oxigen i l’excés de calor i humitat desapareixerà. Per crear aquestes condicions, és necessari instal·lar sistemes que siguin responsables de la ventilació natural i forçada.
Bàsicament, per tal que la sala es pugui ventilar, es fan ventilacions. La seva instal·lació hauria de ser a la part superior de les parets o al terrat. En instal·lar la finestra a la part superior, serà possible proporcionar la millor ventilació. L’aire càlid que puja canviarà de lloc amb l’entrada d’aire fresc i fresc. Es poden fabricar de forma automàtica i manual.
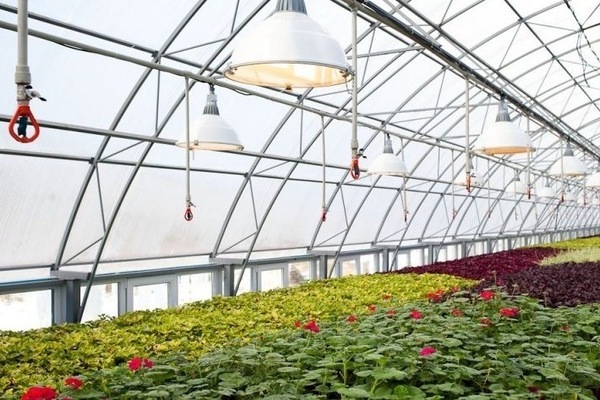
Com fer un hivernacle d’hivern: il·luminació

A l’estiu, la majoria de plantes tenen prou llum que se’ls subministra de manera natural. A l’hivern no hi ha prou llum natural i cal connectar una il·luminació addicional. Per fer-ho, és possible utilitzar làmpades de càrrega de gas DNAT i DNAZ.
La quantitat de llum que es subministrarà amb llum artificial depèn de les varietats cultivades a l'hivernacle. Amb això en ment, s’instal·la el nombre de làmpades requerit. Bàsicament, el càlcul de la potència total de les làmpades es fa tenint en compte la superfície.
Per il·luminar un metre quadrat, serà suficient una potència de 100 watts. Si la superfície és de vint metres quadrats, es necessiten almenys 2000 W, és a dir, 5 làmpades HPS amb una potència de 400 watts. A més, serà necessari utilitzar l’equip de partida.
És important saber que les làmpades DNAT i DNAZ estan molt calentes. Per tant, per utilitzar-les, haureu d’utilitzar làmpades especials que reflecteixin la llum, instal·lant-les al sostre.
Com construir un hivernacle d’hivern i estalviar diners
Si teniu previst cultivar cultius hortícoles a escala industrial en un hivernacle, la superfície del qual és d’uns 100 metres quadrats, seria molt millor demanar-lo a una empresa.
A les plantes de fabricació, podreu construir hivernacles hivernals completament equipats, de tipus agrícola o de bloc, en els quals ja hi ha instal·lats escalfament, reg i ventilació automàtics.
Aquesta elecció requerirà menys costos financers i, al mateix temps, és molt adequada per a dispositius mecanitzats que realitzen manteniment.
Escollir un lloc on s’ubicarà l’hivernacle
Es pot construir per si sol un petit hivernacle hivernal on es preveu conrear hortalisses o altres cultius per al consum domèstic.
Per fer-ho, heu de triar amb antelació un lloc adequat per decidir la forma i la mida. I dibuixa un esquema en què es veurà on s’ubicaran els llits, els sistemes de calefacció, reg i ventilació. També caldrà calcular el cost de tots els materials que es necessitaran.
L’hivernacle hivernal s’hauria d’instal·lar en una zona amb bona il·luminació i protecció contra els vents freds. Es pot connectar al garatge, a les dependències i a la casa, sobretot el costat assolellat.
Si instal·leu l’hivernacle per separat, s’hauria de fer en la direcció de nord a sud, segellant la paret del nord amb materials aïllats o creant-hi una mena de vestidor.
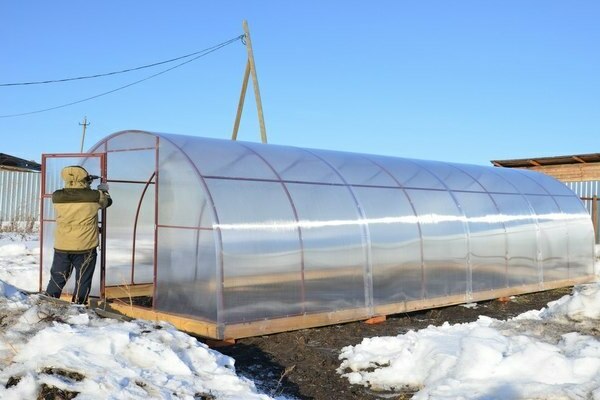
Construcció d’hivernacles
Una estructura més senzilla i fiable, amb un bon aïllament tèrmic, serà una estructura de parets rectes, on el formigó espumós amb aïllament serveixi com a material per establir les parets principals. Al final del costat sud de la paret, s’ha de cosir amb una doble capa de policarbonat. El vestidor, fet al costat nord, servirà de protecció durant una tempesta de neu. També hi podeu instal·lar una sala de calderes i un magatzem d'eines i altres equips.
Amb l’ajut de policarbonat reforçat, s’han de cosir pendents d’hivernacle. En crear una part de suport de la fusta, podeu excloure completament la penetració del fred.
Preparació d’un pla d’acció
Per a un hivernacle de set metres de longitud i tres d’amplada, haureu d’instal·lar la fonamentació:
- formigó 3,6 metres cúbics,
- 100 metres de reforç de 10 mm,
- 130 metres 0,6 centímetres de reforç,
- 1 metre cúbic de tauler d'encofrat de 25 mm tallat,
- 179 unitats. blocs de formigó d'escuma amb dimensions de 200 mm x 300 mm x 600 mm,
- 9 bosses de vint-i-cinc quilograms de cola per a maçoneria,
- 3,3 metres cúbics de poliestirè S de 10 mm,
- 0,5 metres cúbics de taules de 40 x 150 mm per a bigues,
- 5 fulls de policarbonat, el gruix dels quals és de 10 o 16 mm,
- 15 unitats. perfil final L = 210 cm,
- 2 unitats. perfil de carena L = 6 m,
- 12 unitats. perfil de connexió L = 6 m,
- 200 unitats. cargols autorroscants amb rentadora tèrmica.
És important saber que es necessitarà aproximadament un mes i mig per construir un hivernacle. Al mateix temps, l'assecat de la fundació triga unes 4 setmanes a una temperatura exterior d'almenys + 15 graus.
Posar les bases
Si a l’obra s’utilitza formigó cel·lular, la base ha de ser resistent. Una bona opció seria utilitzar formigó armat per a una fundació de tires superficials.
Es necessitaran els fonaments tant per indicar els límits de l’hivernacle com per indicar la ubicació de les mampares capitals entre el vestíbul i la sala de cultiu de les plantes.
Procediment
Cal marcar i netejar el terreny. Traieu tots els residus i males herbes de la zona i deixeu-los anivellats. Feu un marcatge per a la mida de l’hivernacle, fent servir estaques i cordill. Després es fan les marques per a la fonamentació.
Per fer-ho, heu d’instal·lar barres o taulers on hi haurà les cantonades de l’estructura. Una corda s'hi uneix i s'estira per tot el perímetre. Totes les cantonades han de ser perpendiculars entre si i les diagonals han de ser iguals. Els contorns de la fonamentació exterior i interior estan marcats amb cordill.
Es cava una rasa a una profunditat de 50 centímetres d’acord amb les marques. A la part inferior es posa una barreja de pedra triturada i sorra, que queda ben compactada. A continuació, heu d’instal·lar l’encofrat.
Per fabricar-los, heu d’agafar un taulell de 25 mm. En el cas d’un sòl pesat d’alta densitat, l’encofrat es col·loca exclusivament sobre el terra. Si el sòl és lleuger, s’instal·la al fons de la rasa.
A més, es realitza un reforç obligatori de la fonamentació perquè, a causa dels moviments estacionals de la terra, la maçoneria de formigó espumós no s’esquerdi. El grau de reforç 10-A-III (A 400) GOST 5781-82 és adequat per fer reforços longitudinals de la cinta. El grau de reforç 6-A-I (A240) GOST 5781-82 ajudarà a fer massissos transversals. El filferro recuit s’utilitza per lligar el reforç a les interseccions. El reforç de cantonada requereix una atenció especial.
A continuació, s'aboca la base amb formigó. Les dimensions anteriors requeriran 3,6 metres cúbics de formigó. Hi ha qui barreja el formigó per si mateixos. Però no només és prou llarg i difícil, sinó que pot provocar una disminució de la resistència de la base durant l’abocament capa per capa.
Els professionals de la construcció aconsellen demanar material confeccionat. El formigó s'aboca a l'encofrat preparat, s'empeny amb una vareta o un vibroshlag, després del qual s'anivella la superfície.
A continuació, cal esperar que el formigó maduri. Aquest període es produeix en funció del règim de temperatura. Es considera que les condicions més òptimes són temperatures de +18 a +20 graus. En aquestes condicions, al cap de dues o tres setmanes, el formigó serà prou resistent per continuar la construcció. Si la temperatura és diferent, hauríeu d’esperar aproximadament un mes abans de continuar amb els treballs posteriors.
Per mantenir la humitat constant, cobreix el formigó amb polietilè durant el període d'assecat. Quan la capa superior de formigó s’asseca, s’ha d’humitejar amb aigua. El temps durant el qual el formigó guanya força depèn de la temperatura.
És important saber que els encofrats s’eliminen al cap d’una setmana i que es poden utilitzar els taulers més d’una vegada.
Parets de formigó escumós
Quan es col·loquen blocs de formigó cel·lulat, es recomana l’ús de cola especial. Això permetrà obtenir el gruix mínim de les juntes, cosa que reduirà significativament la pèrdua de calor. Si col·loqueu els blocs sobre un morter de ciment, caldrà aïllar i arrebossar addicionalment les parets.
El primer que cal fer és la impermeabilització. Per fer-ho, necessitareu materials de rotllo en forma de material de sostre, bicristal o els seus anàlegs.
Després que la fundació s'hagi assecat completament, cal posar-hi una solució de sorra i ciment en proporcions de 4 a 1. S'ha d'estendre en una capa fina. A continuació, es col·loca la impermeabilització del rotlle de manera que la superposició quedi a les juntes. Després d'això, la superfície s'anivella amb un rail o un nivell.
El segon que cal fer és col·locar la primera fila. Per a això, es col·loquen blocs d'escuma sobre una solució de sorra i ciment a la part superior de la impermeabilització. Quan s’aplica la solució, cal deixar un marge, l’excés es pot eliminar després d’instal·lar els blocs.
Per disposar les files següents, s’utilitza cola especial. S’aplica amb paleta dentada on es troben les superfícies, tant horitzontals com verticals.
Per a un ajust ajustat, s’utilitza un martell de goma, que toca lleugerament amb el qual es realitza aquest treball. Les files es col·loquen amb un embenat a la meitat del bloc.
A continuació, cal reforçar la maçoneria. Per a això, s’utilitza una malla de maçoneria soldada, el procés té lloc a cada segona o tercera fila. Si la paret fa un metre i mig i els blocs fan 30 centímetres d’alçada, la maçoneria hauria de tenir cinc files. Per tant, la malla de reforç pot situar-se entre la tercera i la quarta fila.
La cola s’aplica a la part superior de la malla i després s’instal·la el bloc. La maçoneria es pot reforçar mitjançant barres de reforç que es col·loquen en ranures de blocs.
Per a portes, els blocs es tallen a mida. Són molt fàcils de tallar amb una serra mecànica; s’han de fer segons la plantilla.
La següent etapa inclou l'aïllament de les parets. Això es fa des de l'exterior mitjançant làmines de poliestirè. L’aïllament pot tenir diferents gruixos, tot depèn de la regió on s’instal·li l’hivernacle. Pot ser de 3 centímetres a 15.
Per a les regions del sud del país, s’utilitza poliestirè amb un gruix de 3 o 4 centímetres. Al territori de la regió del Volga, si es tracta de Volgograd o Saratov -4 o 5 centímetres. I si Ulyanovsk, Nizhny Novgorod, Kazan o Izhevsk, el poliestirè hauria de tenir 5 o 6 centímetres de gruix. Al centre de Rússia - 6-7 centímetres, al nord-oest - 7-7 centímetres. Al territori de Vladivostok i Khabarovsk - 7-8 centímetres, als Urals - 7-9 centímetres. A Sibèria, el gruix del poliestirè hauria de ser d’uns 10 centímetres.
Un cop aïllades les parets, s’han d’acabar. Per a això, són adequats els materials resistents a la humitat. Pot ser de maó, revestiment o es pot utilitzar guix. L’acabat millorarà l’aspecte de l’hivernacle i proporcionarà protecció contra el vent i aïllament tèrmic addicionals.
És important saber que es pot utilitzar escuma i poliuretà en lloc de poliestirè. No val la pena utilitzar llana mineral, ja que a l’habitació hi haurà molta humitat.
Cobertes sobre bigues
Per a la fabricació de bastidors de fusta que connecta els bastidors i els sistemes de suport del sostre, s’utilitzen taulers de fusta amb unes dimensions de 4 per 10 centímetres. Les bigues s’instal·len a una distància de 50 centímetres l’una de l’altra.
Per fer-ho, a la paret del sud, la primera capa del tauler es col·loca damunt de la impermeabilització i s’adjunta amb elements de fixació, com ara un ancoratge, a la fonamentació. Mitjançant ancoratges, els pals laterals de taulers s’adhereixen a la maçoneria de formigó espuma. L’arnès superior i els suports intermedis s’uneixen a cantonades d’acer o cargols autorroscants.
Després, la capa superior del tauler es fixa amb ancoratges, que es col·loquen a les parets del bloc al llarg de tot el perímetre. S’uneixen a una distància de 60 centímetres. Això és necessari per distribuir el pes per tota la paret. Si el col·loqueu directament sobre els blocs, la càrrega serà en sentit puntual i això provocarà la destrucció del formigó espumós.
Per fixar les bigues, cal fixar la barra superior. Per fer-ho, els bastidors han d’estar centrats a la capa superior dels taulons de les parets que travessen l’edifici. Es fixen amb cantonades i cargols autorroscants, després dels quals s’instal·len pals diagonals (claus).
Per muntar la biga de la carena, heu de subjectar dues taules de 40 per 100 mm a banda i banda dels bastidors.
Per fer les bigues, necessiteu un tauler de 40 x 10 mm. S’aplica a la barra superior i a la capa superior del tauler a la paret longitudinal. Allà, amb l’ajut d’un llapis, es marca el lloc on es farà la bretxa. A continuació, es realitza una escletxa, es prova una biga, sobre la qual s’enganxarà tota la caixa (també anomenada pota de cabiró) i s’allunya de tot allò innecessari. Cada parell d’aquestes bigues està connectat per plaques metàl·liques a la barra transversal superior.I també es fixen cantonades i cargols a la barra transversal superior i a la capa superior de les taules.
Per embolicar les parets amb policarbonat, n'hi ha prou amb fixar-les en una sola capa. Si el seu gruix és d’1 a 2,5 centímetres, podeu crear una bona protecció contra la pèrdua de calor. El revestiment comença al final de la paret cap al sud. El tall del policarbonat es fa de mida amb la paret, de manera que les costelles estiguin en posició vertical.
El material aïllant per als talls superiors del policarbonat és la cinta adhesiva d’alumini. Les seccions inferiors estan aïllades amb cinta perforada. Els talls es tanquen mitjançant el perfil final. Per fixar el policarbonat s’utilitzen cargols autorroscants i rentadores tèrmiques. El mur del nord i el que separa el vestíbul de l’hivernacle es penja d’una manera similar.
Amb l’ajut de perfils de connexió, es connecten fulls al pendent de l’hivernacle. Amb el perfil d’una sola peça n’hi haurà prou per a policarbonat de 10 mm i, per a un de més gruixut, haureu d’utilitzar un perfil d’alumini dividit amb segellat. Perquè el policarbonat mantingui la seva integritat, s’ha de subjectar a través del perfil.
Per a processar els extrems inferiors de la làmina s’utilitzen tires perforades i perfils finals. Un perfil de carena connecta els vessants superiors.
És important recordar que, un cop finalitzada la instal·lació, tots els buits es segellen amb escuma de poliuretà o s’utilitza un segellador resistent a les gelades.
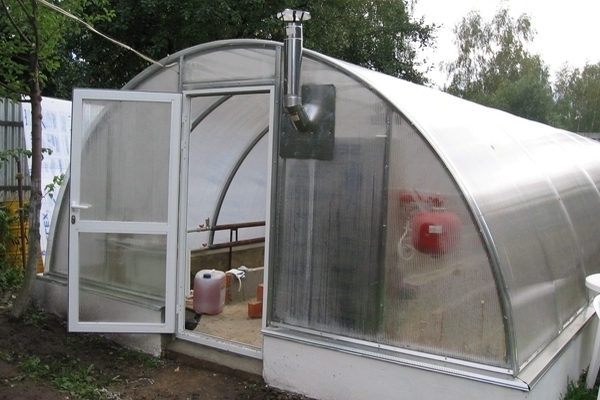
Hivernacle d’hivern: instal·lació de portes
El disseny descrit aquí proporciona dues portes a l'estructura. Un separa el vestíbul de l’hivernacle, l’altre separa el carrer del vestíbul. El que condueix al carrer està aïllat amb polímer termoplàstic o altres materials.
Per a la porta entre el vestidor i l’habitació principal, podeu utilitzar policarbonat i instal·lar-lo en un marc de fusta. El marc de la porta està fixat amb ancoratges de 10 cm. S'insereix a les frontisses i s'hi instal·len dispositius de bloqueig en forma de panys.
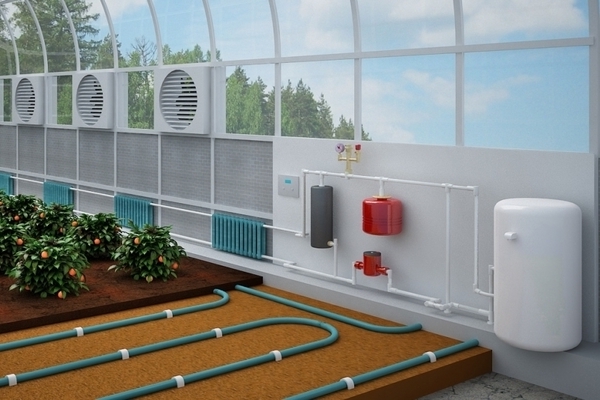
Versió hivernal de l’hivernacle. Fem un sistema de calefacció
L’hivernacle està equipat amb el sistema de calefacció que trieu. Podria ser una caldera i un sistema de radiadors.
Si es tracta d’una caldera, un vestíbul és perfecte per a la seva instal·lació i la seva xemeneia surt al carrer.
Si es tria un sistema de radiadors, per a un hivernacle de la mida que hem considerat, n’hi haurà prou amb disposar-los al llarg de les parets.
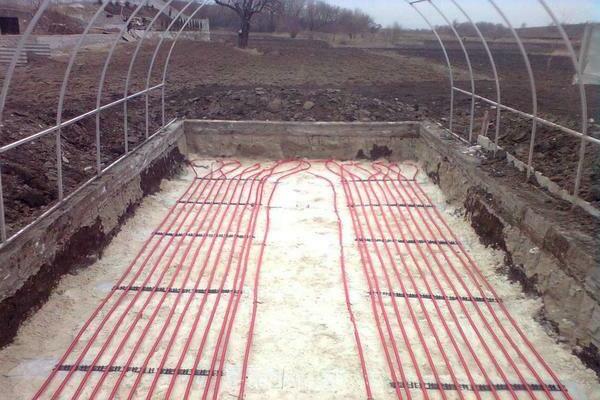
Reg per degoteig per a hivernacle
Els dispositius de reg per degoteig són perfectes per regar plantes en un hivernacle hivernal. El dipòsit es pot col·locar al vestíbul i equipat amb un sistema que s’encarrega de escalfar l’aigua. Les mànegues perforades es subministren a les plantes dels llits. Si les plantes estan en bastidors, els comptagotes són adequats per a elles.
Com conduir la il·luminació
La il·luminació es realitza col·locant làmpades al sostre, ja que algunes d’elles es poden escalfar molt i això pot danyar el policarbonat.
Per augmentar la il·luminació de l’habitació, cal utilitzar lluminàries reflectants.
Tots els cables elèctrics s’encaminen a través de tubs de plàstic o metall corrugats i s’uneixen a l’hivernacle.
A l’hivernacle podeu fer llits i equipar-lo amb bastidors.
A les regions on fa especialment fred, els llits es col·loquen mitjançant la tecnologia de calefacció biològica, elèctrica o d’aigua. Al sud del país, el sol es pot escalfar efectivament amb el sol. N’hi haurà prou de cosir les parets principals de l’estructura amb materials reflectants. A més de la calor, les plantes rebran el doble de llum.
Resultat
Després d’haver instal·lat un hivernacle d’hivern al vostre lloc, hi podeu cultivar verdures o altres cultius durant tot l’any. També pot fer un bonic hivernacle que delectarà la vista durant tot l'any o només a l'hivern. Hi podeu cultivar maduixes, bolets o flors i vendre-les. Hi ha moltes opcions per fer servir l’hivernacle, només cal la vostra imaginació i ganes.